Manuali VOIspeed®
Yealink T2X IP Phones Configuration
The configuration of the terminals certified by VOIspeed should always be carried out with the Autoprovisioning function.
Configuration of Yealink T2X Series IP Phones
Yealink T2eP IP phones with default settings automatically search for a DHCP server on the network during boot to obtain a valid IP address.
PHONE CONFIGURATION
Configuration is done via the web, by connecting with a browser to the phone’s IP address. Obtain the phone’s IP from the DHCP server monitoring or directly from the phone by pressing the Menu softkey (bottom right below the display) and accessing the Status section.
Once connected via the web, the administrator’s username and default password are both set to “admin”. Below we indicate the parameters to be modified with respect to the default configuration, referring to a generic user created on the VOIspeed PBX with the following credentials:
username: 399
password: 3434343xyz!
internal: 399
VOIspeed server ip address: 192.168.0.220
VOIspeed server domain: your_domain.com
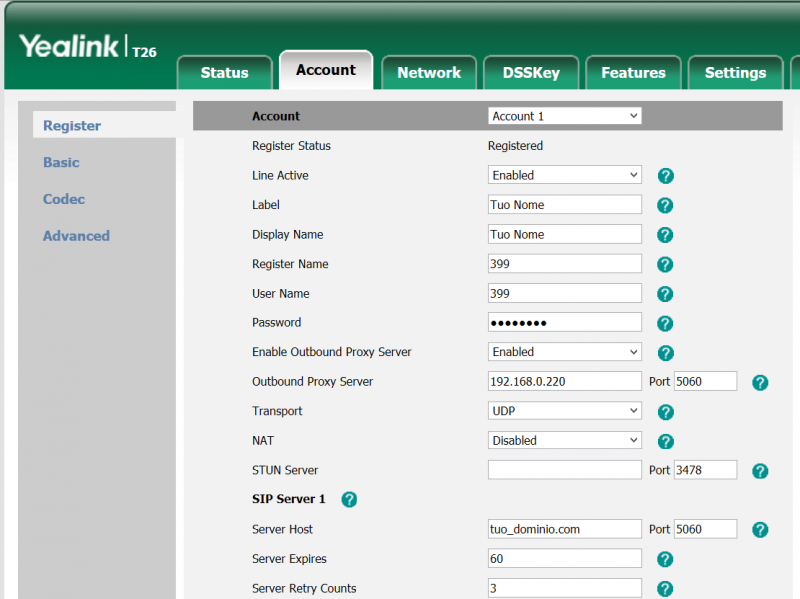
ACCOUNT -> REGISTER
We list below the parameters to be modified
After completing the entry of the above parameters, click on Confirm.
ACCOUNT -> CODEC
FEATURES -> TRANSFER
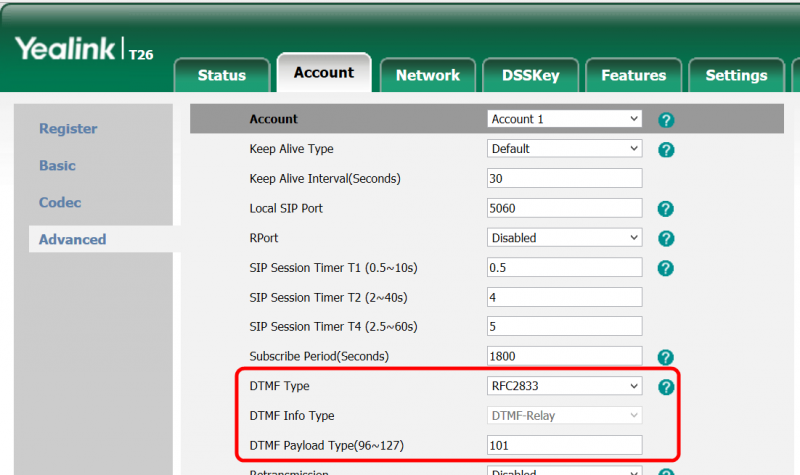
ACCOUNT -> ADVANCED
| In this section you can configure how the phone sends DTMF tones. Use the following settings: DTMF Type: RFC2833 DTMF Payload Type: 101 |
 |
SETTINGS -> TIME&DATE
Set the Time Zone parameter to the value “+1 Italy (Rome)” to the value “+1 Italy (Rome)”
CLICK TO DIAL
The phone natively supports click to dial, i.e. the ability to make calls sent from the users GUI. However, the function must be activated in the terminal configuration of the PBX. In the Toolbox – Terminals section, locate the Yealink SIP-T26P user agent (you can also search for the string “yealink” in the “search” field to locate the terminal). If the user agent is not present it will be necessary to register the first telephone. After identifying the user agent of the phone, enter into edit and enable the “click to dial supported” function.
CONFIGURATION OF BLF KEYS
The telephone line keys and expansion modules, if present, can be used to view the status of the switchboard extensions and to make calls quickly. To configure a BLF key go to the DSSKey menu.

Do not modify the first row of the table (Line Key1) because it represents the line connected to the switchboard. Then start from the second line (Line Key2) and set:
Type: BLF
Value: internal of the desired user
Line: account configured on the phone to which to connect the BLF
Extension: leave the field blank
The LED associated with the button will indicate the status of the extension (the graphic part is always fixed) in this mode:
green: user free or off
flashing red: user is ringing
steady red: user busy
AUTOMATIC USER IMPORT WITH CUSTOM RING
Warning: this procedure, if intended to differentiate the internal bells, can be avoided in the new version 6.5.X for PBX, since now it is the switchboard that sends the type of call (internal / external) to the terminals, using the SIP Alert method. Info. For information see this article.
It is possible to import the switchboard extensions into the local phone book and specify a desired ringtone for them so that external calls can be distinguished from internal ones. Follow the steps below:
- Enter the WEB administration of the phone
- Go to the Directory / Local directory section

- Click on the Import Csv button as in the image below:
- Import the appropriately modified file according to the template available here, customizing the display_name, office_number, ring and group_id_name fields


