Manuali VOIspeed®
VOIspeed V-6019 FXO Adapter Configuration
The VOIspeed V-6019 analog line adapter is an analog line adapter, which must be connected to the local company network. It is equipped with two RJ11 ports, one positioned laterally for connecting a PSTN analog line (“Line” = FXO) and the other positioned at the rear to connect an emergency analog telephone (“Phone” = FXS).
Thanks to the V-6019 the switchboard can manage a traditional telephone line (PSTN) as if it were a SIP carrier.
In the event of a power failure, the emergency telephone (connected to the “Phone” port) becomes the telephone terminal for the PSTN line connected to the FXO port. The adapter is also equipped with a second network port (LAN), configured as a switch, which allows the connection of multiple VOIspeed V-6019 adapters in cascade, or the connection of any other device to the company network, although it is recommended not to use it to preserve voice quality.
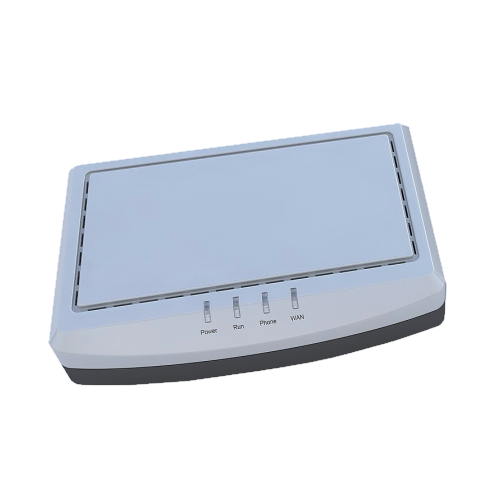
| SIDE PANEL DESCRIPTION | |
| Line (FXO) | The telephone cable of the analogue line (PSTN) to be managed, ie to the wall socket, must be connected to this port. |
| REAR PANEL DESCRIPTION | |
| Phone (FXS) | Phone (FXS) This is the emergency line port to which a normal analog telephone can be connected. This will come into operation in the event that the power supply to the adapter is missing. In this way you will not lose the functionality of the line. Furthermore, using the telephone connected to the FXS port, the basic configurations of the adapter can be created. |
| LAN | Repeats the data network present on the LAN port. This port can also be used to cascade multiple adapters. |
| WAN | Port for connecting to the data network. The adapter will use this port for all connections to / from the switchboard and for the update procedure. |
| POWER | Connector for the power supply. We remind you that it is forbidden to connect a power supply other than the one supplied with the adapter. If a power supply other than the original is connected, the product is no longer covered by the VOIspeed warranty. |
The adapter uses only the WAN port to communicate with the switchboard.
INSTALLATION
Below are the steps for a correct installation of the adapter:
1) Connect an analog tone telephone to the adapter using the “Phone” port
2) Insert a standard RJ11 telephone cable (included in the package) into the “Line” port and connect the other end to the analog socket in the wall
3) Use an ethernet cable (included in the package) to connect the adapter to the network: connect the Ethernet cable to the V-6019 WAN port and the other end to a network device (switch, hub, ..)
4) Insert the power supply (included in the package) into the V-6019 and connect it to the mains
KNOW THE IP ADDRESS OF THE V-6019 WHITE
By default, as soon as the network cable is connected to the WAN port, the adapter asks for a valid IP address from the DHCP server. In order to know this address, simply use the voice menu.
Enter *** from the telephone connected to the “Phone” port to access the voice menu. Press ** again to listen to the IP address of the adapter.
If the item indicates the value 0.0.0.0 as an IP address, there were problems in assigning it or you do not have a DHCP server reachable by the adapter. In this case it will be necessary to configure the IP address manually through the voice menu.
Below are the various steps to follow for the manual configuration of the network interface.
1) Enter the V-6019 IVR by typing *** from the analog tone telephone connected to the “Phone” port
2) Invoke command 01 followed by 9 to switch to static mode.
3) Command 02 followed by the desired IP address,
4) Command 03 followed by the netmask
CONFIGURE THE ADAPTER
This configuration has the great advantage of being able to exploit the line optimally through the LCR module and therefore managing the various prefixes and time tables.
The first thing to do is reset to factory settings.
Factory Reset:
By restoring the factory settings, all configurations and settings will be cleared.
1) Press “***” from the analog telephone connected to the FXS (Phone) port to access the voice menu.
2) Enter “99” and listen to the voice that says “Reset”.
3) Enter the number “862584658050”. At this point you will hear a “Click” and the device will restart.
4) Wait at least 15 seconds.
The device is now restored to factory settings.
In this manual, only the parameters that must be changed with respect to the Default ones will be indicated, therefore leave all the parameters not covered below, exactly as they are after resetting to factory settings.
Access to the Web interface
Then proceed as follows
1) Enter the V-6019 configuration web interface (enter in the address bar of any browser: http: // ip_v6019)
2) Enter the password (admin) to log in
Basic Options Configurations for On Premises Platform
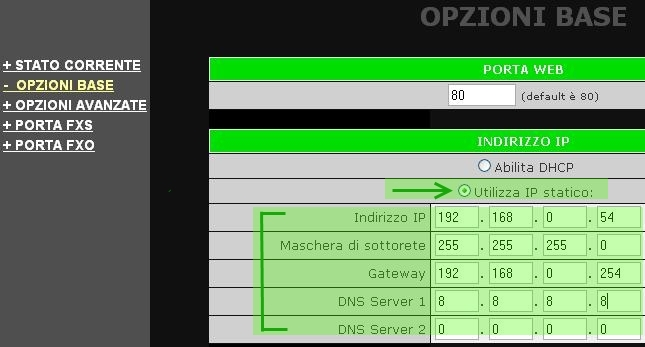
In the Base Options section, assign a static IP address to the adapter.
DO NOT copy the above IP addresses: they are used for demonstration purposes only. Enter the addresses consistently with the installation.
Number: set the number to which all incoming calls are to be diverted. This number must correspond to a company number of the VOIspeed Server.
Server SIP: set the IP address of the PBX Server
SIP port: set port 5060
Basic Options Configurations for the UCloud Platform
Number: set the number to which all incoming calls are to be diverted. This number must correspond to a company number of the VOIspeed Server.
SIP Server: enter the IP address or URL of the UCloud server
SIP port: the SIP port varies for each company of the UCloud PBX, therefore it is necessary to consult in the PBX settings which port is your own. Connect to the Configuration → Company menu and see the value of the SIP Gateway Port parameter in the Properties pane.
Save the changes and wait at least 5 seconds before changing the section.
FXS Port Options Configurations (valid for all platforms)
The FXS account must be disabled therefore in the “FXS Port” section, in the “Activate account” option you must check “No“
Save the changes and wait at least 5 seconds before changing the section.
FXO Port Options configurations for the On Premises platform
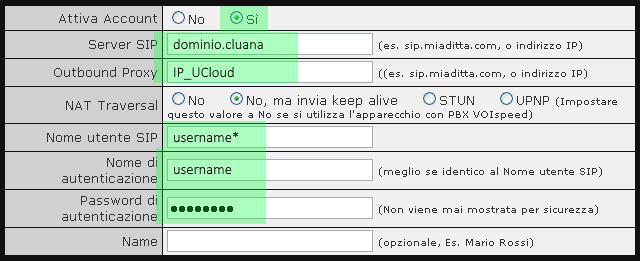
In the section “FXO Port Options” make the following changes:
| UCloud Settings | On Premises Settings |
 |
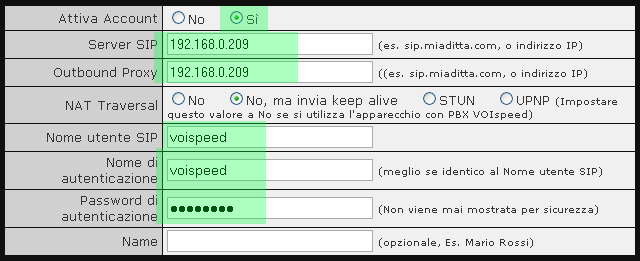 |
| Field Name | Value UCloud | Value On Premises |
| Enable Account | Check mark set to Yes | Check mark set to Yes |
| Server SIP | UCloud Corporate Domino | IP address of the local PBX |
| Outbound Proxy | IP of the UCloud server: port | IP address of the local PBX |
| SIP Username | Analog gateway username | Analog gateway username |
| Authentication Name | Username of the analog gateway | Username of the analog gateway |
| Authentication Password | Analog Gateway Password | Not required |
| Field Name | Value UCloud | On Premises Value |
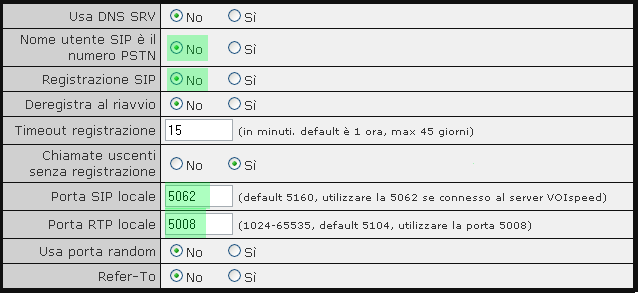
| SIP Username is the ISDN number | Check mark set to No | Check mark set to No |
| SIP registration | Check mark set to Yes | Check mark set to No |
| Local SIP Port | Enter port 5062 | Enter port 5062 |
| Porta RTP locale | Enter port 5008 | Enter port 5008 |
| Field Name | Value UCloud | Value On Premises |
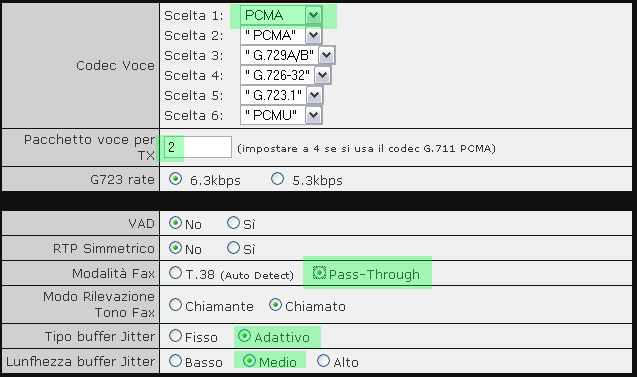
| Codec Item | Set as Primary PCMA codec and as secondary G.729A/B | Set as Primary PCMA codec |
| Voice packet for TX | This value must be set to 2 | This value must be set to 2 |
| Fax Mode | The V6019 is NOT for use with faxes | V6019 is NOT for use with faxes |
| Jitter buffer type | Set Adaptive | Set Adaptive |
| Jitter Buffer Length | Set to Medium | Set to Medium |
Common settings for both VOIspeed platforms
| Field Name | Value |
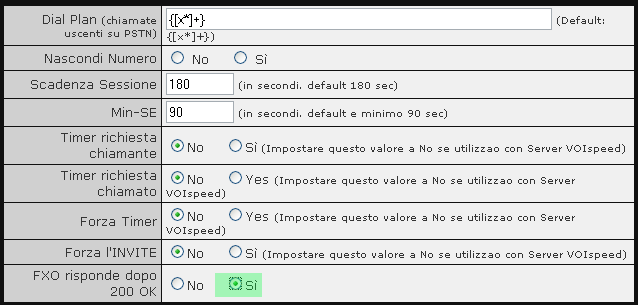
| FXO responds after 200 ok | Set the value to “Yes“ |
| Field Name | Value |
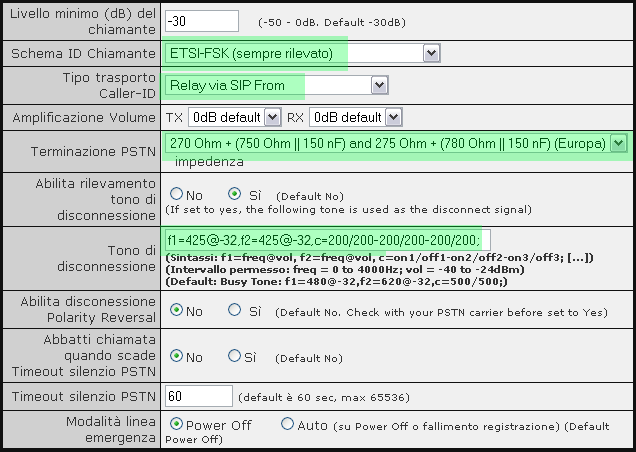
| Schema ID Chiamante | ETSI-FSK Caller ID Scheme (always detected) |
| Transport Type Caller-ID | Ralay via SIP From |
| PSTN termination | 270 Ohm + (750 Ohm || 150nF) and 275 Ohm + (780 Ohm || 150 nF) (Europe) |
| Disconnection tone | f1=425@-32,f2=425@-32,c=200/200-200/200-200/200; |
Save the changes and wait at least 5 seconds before changing the section.


