Manuali VOIspeed®
Manage my company’s geographic numbers
Managing the company’s geographical numbers is very important for the correct functioning of the switchboard, because company numbers are the numbers that the PBX uses to manage incoming calls from its gateways. In essence, they are the geographic or VoIP numbers of company telephone lines or numbers (of convenience or even simple strings) of a WAN route that occur at the entrance to the PBX, which then has to sort to the different entities (groups, IVRs, users, etc. ) thanks to the routing rules.
Therefore, without the definition of the company numbers and the relative routing rules, the switchboard will not be able to manage any incoming calls which will consequently be rejected. Corporate numbers are created “independently” by the various entities (or interfaces). Once created, they must be associated with a specific entity (a gateway, a responder, a group of users or a single user) who will be in charge of managing the call for that number.
The section in question is located in the configuration area of the companies Configuration – Company (the desired company must be selected).
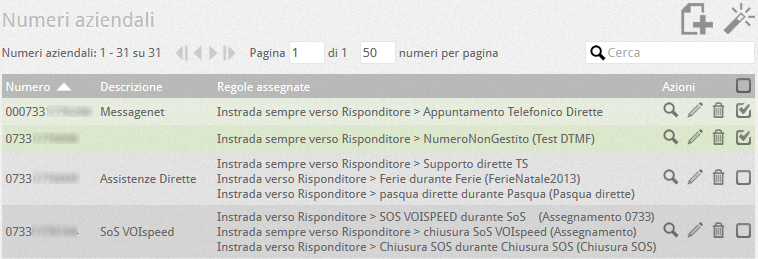
Click on the  button next to the desired company to be able to check the details and company numbers associated with it. For each numbering, the routing rule or rules assigned to it are summarized.
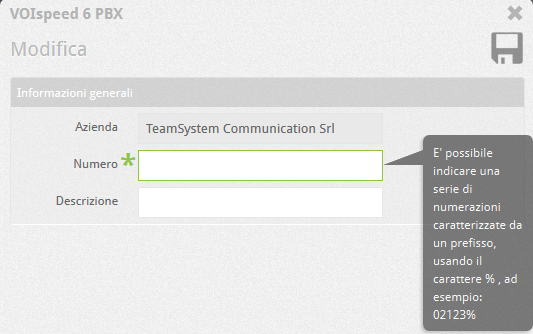
Enter the number associated with the company. It is possible to choose between 3 options:
- Assign: activates the guide (wizard) that helps the user to configure a routing rule for that number
- Continue: save the current number and ask for a new number to be added
- Close: save the current number and return to the home page showing all business numbers
ROUTING RULES CONFIGURATION WIZARD
The Assign option starts the wizard, the wizard that in 6 simple steps allows you to create the route for the company number.
Step 1 – Welcome: The wizard starts with the presentation of the newly created issue.
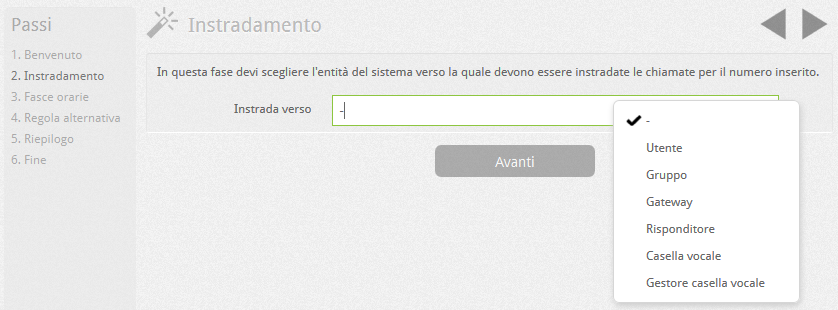
Step 2 – Routing: Pressing the next button  continues with the Wizard which asks which entity (single user, user group, gateway, responder, voicemail, Voicemail Manager) will take charge of the call coming from the number created:
Step 3 – Time bands: Press the next button  to continue with the wizard: you will be asked if this number must be managed at particular times of the day (time tables) or not. Choose Always if you do not want to use time tables, choose the other option if not, then press the next button
  to continue:
If you choose to select a time table, the system will guide the user in choosing the time slots created.
Note: if no table exists, the system will give the possibility to create it immediately, select it and then return to the wizard.
Step 4 – Alternative Rule: if a time table was chosen in the previous step, in this step it will be necessary to establish what to do if the call for the company number arrives outside of it. If not, step 4 will show a simple warning and suggest you move on to the next step.
NOTE: the Wizard assumes that there are only 2 “periods” of operation for the PBX: the one provided by the explicit timetable created by the administrator and the one, implicitly always present, “complementary” to the first. To be clearer, if the table created by the administrator indicates company opening hours (e.g. 8.00-12.00 and 14.00-18.00), the implicit table, which does not need to be explicitly created, will indicate the business hours. closing (18.00-8.00 and 12.00-14.00). If you need to add other particular periods, you will have to create them as time tables and create a manual routing in the routing rules.
Step 5 – Summary: then press the next button  to continue. The system offers a summary of the information collected:
Pressing the  next button again will create the routing rule with the data collected in the wizard.
In every point of the Wizard it is You can retrace your steps by pressing the  back button.
ASSIGN THE SAME ROUTING RULE TO MULTIPLE NUMBERS
When the company has one or more public numbers that must be routed in the same way, from version 6.5 of VOIspeed it is possible to do it in a single step. To do this, you need to create the company numbers without assigning them (i.e. click on Continue)
Then you need to select the desired numbers: the magic wand button will appear 
Clicking on the magic wand will start the wizard already seen, with the only difference the first step of the wizard displays the selected numbers:
From here on you can continue with the wizard as indicated above.
NOTE: the effect of this operation is the creation of as many individual routing rules as there are selected numbers.
MODIFICATION OF A ROUTE
It is possible to modify a route already created if necessary. To do this, select the desired company number, click on the wand button  that will appear at the top and continue with the wizard. At this point the wizard will notice that a route already exists for the selected number (s) and will show a warning message.
THROUGH SELECTION
If a company number is to be configured for direct dialing, enter the root number followed by the% symbol (eg 07338117%). The% symbol indicates the “variable” digits of direct dialing: by configuring this type of number, all the calls that enter the PBX with the indicated root will be “transformed” into calls for numbers consisting of only the remaining digits (eg: the call to number 0733811756 will become a call for 56). In this case it makes no sense to create a route for this particular number, so you do not need to start the wizard, but you need to click Close and go to the manual configuration of the mapping of the remaining digits in the routing rules.


